SonicDICOM Setup Manual
©2013-2014 JIUN Corporation
All rights reserved.
SonicDICOM Setup Manual
Contents
Register a DICOM Provider (SCP)
Delete the DICOM Provider (SCP)
Change the Port used by the Web Server
Change the Location Data is Saved
Check the Amount of Space You Have to Save Data
3. Download Microsoft SQL Server
4. Installing Microsoft SQL Server
6. Exporting an existing database
7. Switching to Microsoft SQL Server 2014
8. Importing data to the new database
[FAQ] Can I connect it to another company's DICOM Viewer?
[FAQ] How do I check my IP address?
[FAQ] How do I set a fixed IP address?
[FAQ] How do I check my communication port?
[FAQ] How do I change my communication port?
[FAQ] How do I check my AETitle?
[FAQ] How do I change my AETitle?
[FAQ] What to do if you have garbled text.
1. Overview
This page explains how to start using SonicDICOM.
Features
SonicDICOM is PACS software that combines the capabilities of DICOM Server with web browser based DICOM Viewer.
The free version has a limit of up to 100 studies, but there is no limit other than that.
DICOM Server
- DICOM Storage / SCP
- DICOM Find, Move / SCP
- DICOM Verification / SCP
- DICOM Print / SCU*
- DICOM Storage / SCU
- Importing function of DICOM files
DICOM Viewer
- Save your search criteria
- Editing and deleting function of study, series, image information
- Exporting function of DICOM files
- Exporting function of JPEG files*
- Transmission function of DICOM files (DICOM Storage)
- Display and compare multiple studies or series simultaneously
- Display in split-view by series (maximum 6x6)
- Changing the window level
- Pan and zoom function
- Rotation of the image
- Magnifying glass function
- Black-and-white inversion function
- Vertical and horizontal inversion function
- Cine play function
- Measurement function*
* is currently in development
Other features
- Just log in from a web browser to begin browsing images, no need to install software on each individual terminal.
- Any PC in your facility can browse images by accessing the server.
- Licensing fees are not required for each terminal. SonicDICOM can be used by an unlimited number of clients.
- You can assign image browsing permission to only specified users through account management.
- Settings are straightforward, and you can continue using your existing DICOM Viewer (*DICOM Viewer must have Q/R functions).
System requirements
DICOM Server
- Microsoft .NET Framework 4.5 must be installed (link)
- Microsoft Windows OS (32bit / 64bit)
- Windows Vista SP2
- Windows 7 SP1
- Windows 8
- Windows 8.1
- Windows Server 2008 SP2
- Windows Server 2008 R2 SP1
- Windows Server 2012
- Windows Server 2012 R2
- Dual Core CPU or higher
DICOM Viewer
- Web Browser
- Mozilla Firefox 25 or higher
- Google Chrome 31 or higher
- Internet Explorer 10 or higher
* Smartphones and tablets are not supported.
- 1024x768 screen resolution
Specifications
Database
The standard database used by SonicDICOM, Microsoft SQL Server Compact 4.0, is limited to a maximum storage capacity of 4GB.
The number of studies that can be saved within that limit depends on the environment, but we expect it to be approximately 30,000 - 100,000.
In our environment, capacity is about 40MB with about 1,000 studies saved.
The database used in SonicDICOM can be changed to Microsoft SQL Server 2012.
The maximum storage capacity of the freely available Microsoft SQL Server 2012 Express Edition is 10GB.
You can also use the other edition, Microsoft SQL Server 2012, which can be purchased for a fee.
We provide free support for transferring databases.
There are never any additional charges.
2. Getting Started
Download
You need to have "Microsoft .NET Framework 4.5" installed in your PC to run SonicDICOM.exe.
If not installed, download from the following website and install first.
http://www.microsoft.com/en-us/download/details.aspx?id=40779
* Windows 8 has "Microsoft .NET Framework 4.5" preinstalled. You do not have to install it again if you are running Windows 8.
Please download SonicDICOM on the download page.
You can choose whether a zip file or installer.
It is recommended that you use the installer if there is no reason in particular.
Installation
If you use the installer:
Double-click "sonicdicom_setup.exe" to run the installer.
Just follow the wizard, the installation is complete.
When the installation is complete, please start the software by double-clicking the icon on the desktop.
If you use a zip file:
Unzip "sonicdicom.zip".
Move the unzipped "SonicDICOM" folder to a suitable location (e.g., C:/ ).
Please start the software by double-clicking the "SonicDICOM.exe" file in the "SonicDICOM" folder.
The server settings wizard will start automatically when you run the SonicDICOM.exe.
You can complete basic setup just by following this wizard.
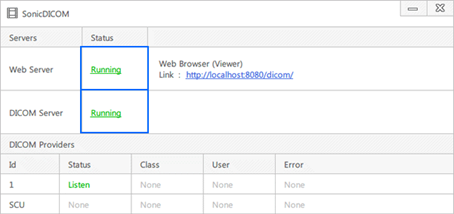
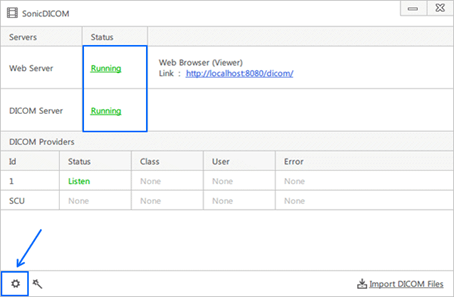
Parts of the server screen
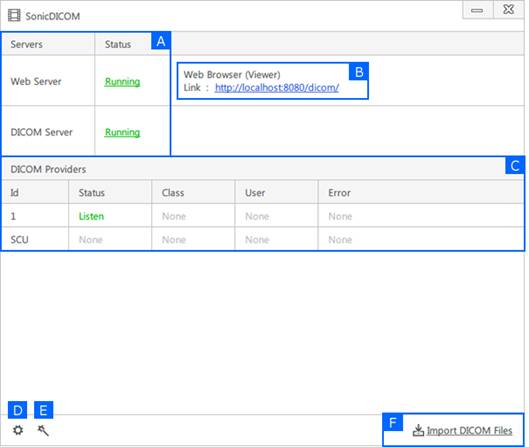
A. Server status
B. Viewer URL
C. Connection Status
D. Settings button
E. Setup wizard button
F. Import DICOM files
Login to SonicDICOM
1. Run SonicDICOM.exe.
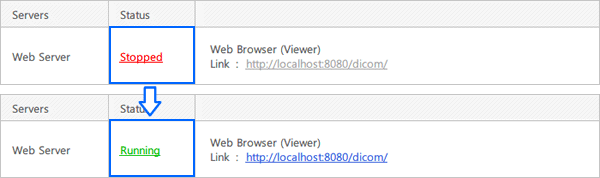
2. Click "Stopped" to start the Web Server.
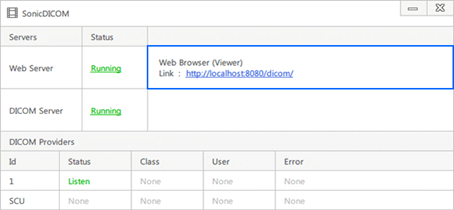
3. Start up a web browser (Firefox, Google Chrome, etc.) and access the following URL.
URL: http://localhost:8080/dicom/
When accessing from another PC:
When accessing from a PC other than that is running SonicDICOM.exe, but within the same network, replace the "localhost" part with the IP address of the PC running SonicDICOM.exe.
For example: if the IP address of the PC running SonicDICOM.exe is 192.168.100.10, this would be "http://192.168.100.10:8080/dicom/".
4. When the login screen comes up, input the following ID and Password (initial values), and click the Login button.
ID: admin
Password: password
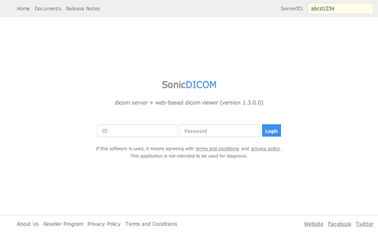
*For security purposes, please change your initial password. (How to change your password)
Start/Stop the Server
When using the Windows Application:
1. Run SonicDICOM.exe.
2. Click on either "Running" or "Stopped" to start or stop the server.
|
Web Server |
You must have started the Web Server in order to access the Viewer. If you stop the Web Server, you will not be able to view images using the Viewer. |
|
DICOM Server |
*You must have started the DICOM Server in order to receive images from Modality and view other images using the DICOM Viewer. If you stop the DICOM Server, you will not be able to access images from Modality or others through the DICOM Viewer. |
When using the Viewer (web browser):
You can start/stop the DICOM server from the Viewer.
1. Access SonicDICOM from your web browser, and login with an administrator's account.
* Only accounts with Admin authority can perform these operations.
2. Click the
Admin Settings button (![]() ) to
open the settings menu.
) to
open the settings menu.
3. Click on either "Running" or "Stopped" to start or stop the server.
Import the DICOM Files
1. Run SonicDICOM.exe.
2. Click "Import DICOM Files".
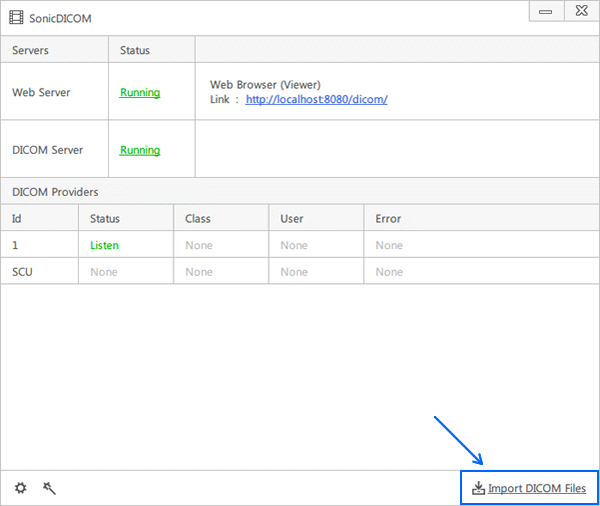
3. Click on the "Browse" button to select the location of a DICOM file to be imported.
4. Click on the "Import" button, and the target DICOM file will be imported.
* If importing fails, please send the relevant DICOM file to "sonic@sonicdicom.com".
Our support team will look into the problem and get back to you as soon as possible.
By using the import function, you can try out SonicDICOM without setting up a connection with a modality.
If you do not have DICOM files on hand, please download the sample files from here to use.
URL: http://sonicdicom.com/download/sample.php
Receive images from Modality
1. Check basic parameters
For DICOM communication to take place, three parameters must be properly configured, so please check SonicDICOM's parameters.
(1) IP address: identification number assigned to a computer or other device that is connected to an IP network
IP addresses are like home addresses or telephone numbers on an IP network.
By default, Windows is set up to configure the IP address automatically when connecting to a network. In other words, the IP address can change every time you start up the OS.
In devices that utilize DICOM communication, you need to set a fixed IP address to keep the address from changing.
Please make sure you understand your network in order to properly configure your IP address. If you do not understand, please consult your network administrator or another person who can assist you.
[FAQ] How do I check my IP address?
[FAQ] How do I set a fixed IP address?
(2) Communication port number: number for identifying the programs used by the computer to communicate
If you used the SonicDICOM.exe setup wizard and are using the default values without any change, then the communication port number is 104.
[FAQ] How do I check my communication port?
[FAQ] How do I change my communication port?
(3) AETitle: name for identifying the application entities utilizing DICOM communication
If you used the SonicDICOM.exe setup wizard and are using the default values without any change, then the AETitle is "SonicDICOM".
If you used the SonicDICOM.exe setup wizard and are using the default values without any change, then your SonicDICOM parameters are as follows.
(1) IP address: please check individually
(2) Communication port number: 104
(3) AETitle: SonicDICOM
[FAQ] How do I check my AETitle?
[FAQ] How do I change my AETitle?
2. Enter SonicDICOM's information into the modality
You need to enter SonicDICOM's information into the modality you are connecting to SonicDICOM.
- SonicDICOM's IP address
- SonicDICOM's communication port
- SonicDICOM's AETitle
Configuration methods differ depending on the modality, so please check with the manufacturer's support staff or another person who can assist if you do not understand.
3. Check communication
Please confirm that images can be sent normally to SonicDICOM.
[FAQ] What to do if you have garbled text.
Connect the DICOM Viewer
1. Getting started
For DICOM communication to take place between SonicDICOM and a device, you must enter connection information into each machine.
Once you have configured both machines, they are ready, and DICOM communication can now take place.
2. Basic parameters
For DICOM communication to take place, three parameters must be properly configured.
(1) IP address: identification number assigned to a computer or other device that is connected to an IP network
IP addresses are like home addresses or telephone numbers on an IP network.
By default, Windows is set up to configure the IP address automatically when connecting to a network. In other words, the IP address can change every time you start up the OS.
In devices that utilize DICOM communication, you need to set a fixed IP address to keep the address from changing.
Please make sure you understand your network in order to properly configure your IP address. If you do not understand, please consult your network administrator or another person who can assist you.
[FAQ] How do I check my IP address?
[FAQ] How do I set a fixed IP address?
(2) Communication port number: number for identifying the programs used by the computer to communicate
If you used the SonicDICOM.exe setup wizard and are using the default values without any change, then the communication port number is 104.
[FAQ] How do I check my communication port?
[FAQ] How do I change my communication port?
(3) AETitle: name for identifying the application entities utilizing DICOM communication
If you used the SonicDICOM.exe setup wizard and are using the default values without any change, then the AETitle is "SonicDICOM".
If you used the SonicDICOM.exe setup wizard and are using the default values without any change, then your SonicDICOM parameters are as follows.
(1) IP address: please check individually
(2) Communication port number: 104
(3) AETitle: SonicDICOM
The three parameters are set up in the same way for modalities, DICOM viewers, and other devices, so please check the parameters on the device you wish to connect.
If you do not understand, please check with the manufacturer's support staff or another person who can assist you.
[FAQ] How do I check my AETitle?
[FAQ] How do I change my AETitle?
3. Enter, in SonicDICOM, the information for the device you are connecting
Enter, in SonicDICOM, the information for the device you are connecting.
- IP address of the device you are connecting
- Communication port of the device you are connecting
- AETitle of the device you are connecting
Clicking on Admin
Settings button (![]() ) brings up the Setting screen.
) brings up the Setting screen.
* Only accounts with Admin authority can perform these operations.
To register a DICOM user (modality or DICOM viewer), expand the list of the relevant provider.
After expanding, input Name(Use a name that will be easy for the user to manage), IPAddress, AETitle, and Communication Port, and click on the registration button.
Restart the server for the changes to take effect.
4. Enter SonicDICOM's information into the device
You need to enter SonicDICOM's information into the device you are connecting to SonicDICOM.
- SonicDICOM's IP address
- SonicDICOM's communication port
- SonicDICOM's AETitle
Configuration methods differ depending on the modality or DICOM viewer being used, so please check with the manufacturer's support staff or another person who can assist if you do not understand.
5. Check communication
After you have finished configuring both machines, DICOM communication can take place.
Please confirm that images can be viewed normally from SonicDICOM
[FAQ] What to do if you have garbled text.
3. Account
Create an Account
1. Access SonicDICOM from your web browser, and login with an administrator's account.
* Only accounts with Admin authority can perform these operations.
2. Clicking on Admin
Settings button (![]() ), brings up the Setting screen.
), brings up the Setting screen.
3. Click the Member tab. You will see currently registered accounts displayed.
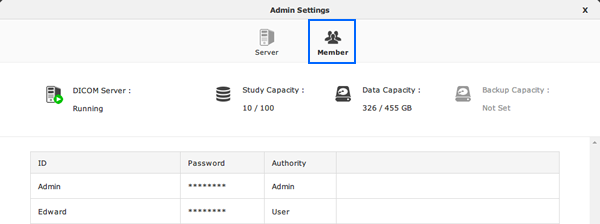
4. Input ID, Password, and Authority, and click on the add button.

Delete an Account
1. Access SonicDICOM from your web browser, and login with an administrator's account.
* Only accounts with Admin authority can perform these operations.
2. Clicking on Admin
Settings button (![]() ) brings up the Setting screen.
) brings up the Setting screen.
3. Click the Member tab. You will see currently registered accounts displayed.
4. An account can be deleted by moving the cursor over the account to be deleted in the list, and clicking on the delete button.

Change Account Information
1. Access SonicDICOM from your web browser, and login with an administrator's account.
* Only accounts with Admin authority can perform these operations.
2. Clicking on Admin
Settings button (![]() ) brings up the Setting screen.
) brings up the Setting screen.
3. Click the Member tab. You will see currently registered accounts displayed.
4. The registered contents can be changed by moving the cursor over the account to be changed in the list, and clicking on the edit button.

4. DICOM Server
Register a DICOM Provider (SCP)
1. Access SonicDICOM from your web browser, and login with an administrator's account.
* Only accounts with Admin authority can perform these operations.
2. Clicking on Admin
Settings button (![]() ) brings up the Setting screen.
) brings up the Setting screen.
3. Enter the Name, AE Title, Port, then click the add button.

* To reflect the changes, you must restart the DICOM Server.
(Server will not work during the restart.)
Edit the DICOM Provider (SCP)
1. Access SonicDICOM from your web browser, and login with an administrator's account.
* Only accounts with Admin authority can perform these operations.
2. Clicking on Admin
Settings button (![]() ) brings up the Setting screen.
) brings up the Setting screen.
3. The registered contents can be changed by moving the cursor over the provider to be changed in the list, and clicking on the edit button.

4. Enter the Name, AE Title, Port, then click the update button.

* To reflect the changes, you must restart the DICOM Server.
(Server will not work during the restart.)
Delete the DICOM Provider (SCP)
1. Access SonicDICOM from your web browser, and login with an administrator's account.
* Only accounts with Admin authority can perform these operations.
2. Clicking on Admin
Settings button (![]() ) brings up the Setting screen.
) brings up the Setting screen.
3. The registered contents can be deleted by moving the cursor over the provider to be deleted in the list, and clicking on the delete button.

* To reflect the changes, you must restart the DICOM Server.
(Server will not work during the restart.)
Register a DICOM User (SCU)
1. Access SonicDICOM from your web browser, and login with an administrator's account.
* Only accounts with Admin authority can perform these operations.
2. Clicking on Admin
Settings button (![]() ) brings up the Setting screen.
) brings up the Setting screen.
3. To register a DICOM User (modality or DICOM viewer), expand the list of the relevant provider.

4. Input Name, IP Address, AETitle, and Port, and click on the add button.
* To reflect the changes, you must restart the DICOM Server.
(Server will not work during the restart.)
Edit the DICOM User (SCU)
1. Access SonicDICOM from your web browser, and login with an administrator's account.
* Only accounts with Admin authority can perform these operations.
2. Clicking on Admin
Settings button (![]() ) brings up the Setting screen.
) brings up the Setting screen.
3. To edit a DICOM User (modality or DICOM viewer), expand the list of the relevant provider.
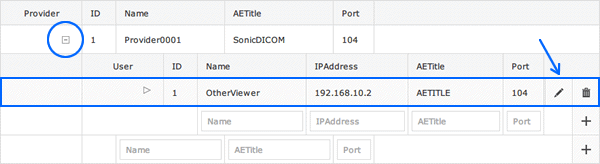
4. The registered contents can be changed by moving the cursor over the DICOM user to be changed in the list, and clicking on the edit button.
* To reflect the changes, you must restart the DICOM Server.
(Server will not work during the restart.)
Delete the DICOM User (SCU)
1. Access SonicDICOM from your web browser, and login with an administrator's account.
* Only accounts with Admin authority can perform these operations.
2. Clicking on Admin
Settings button (![]() ) brings up the Setting screen.
) brings up the Setting screen.
3. To edit a DICOM User (modality or DICOM viewer), expand the list of the relevant provider.
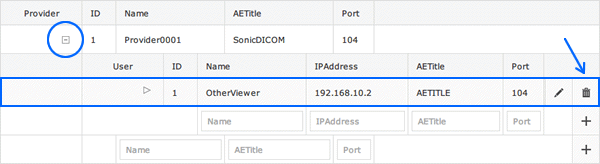
4. A client can be deleted by moving the cursor over the DICOM user to be deleted in the list, and clicking on the delete button.
* To reflect the changes, you must restart the DICOM Server.
(Server will not work during the restart.)
5. Maintenance
Check the Connection Status
1. Run SonicDICOM.exe.
2. You will see the DICOM Server connection status displayed.
Waiting:

Connected:

Error:

(Save the Error Log)
1. Click the red text.
2. Click the Save button.
3. Choose a save location, then click the Save button.
* If an error has occurred and you cannot resolve the issue yourself, please send the relevant Error Log to "sonic@sonicdicom.com". We will look into the problem and get back to you with solutions as soon as possible.
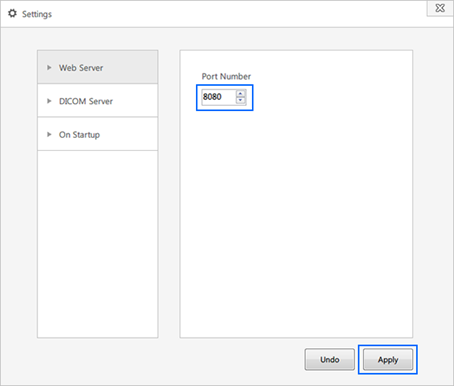
Change the Port used by the Web Server
You can change the Ports used by the Web Server.
1. Run SonicDICOM.exe.
2. Click "Running" to stop the Web Server and DICOM Server.

3. Click the
Settings button (![]() ) to open the
Settings menu.
) to open the
Settings menu.
4. Enter the Port number you wish to use, and then click the Apply button.
Change the Location Data is Saved
1. Run SonicDICOM.exe.
2. Click "Running" to stop the Web Server and DICOM Server.

3. Click the
Settings button (![]() ) to open the
Settings menu.
) to open the
Settings menu.
4. Open the DICOM Server tab.
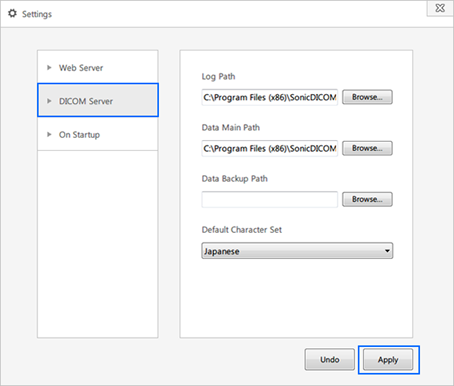
5. Choose the location you want to save data, and then click the Apply button.
|
Log Path |
Specify log output destination. |
|
Data Main Path |
Specify destination where to save data. |
|
Data Backup Path |
Specify destination where to backup data. Default settings are blank (no backup), but you are encouraged to prepare for hard disk drive (HDD) failure by backing up to a different HDD from the one specified to save data. |
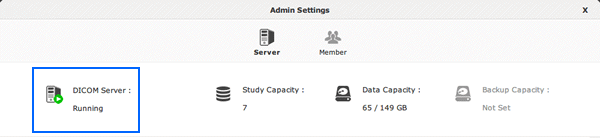
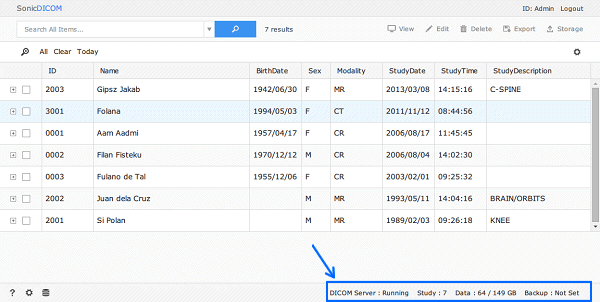
Check the Amount of Space You Have to Save Data
1. Access SonicDICOM from your web browser, and login with an administrator's account.
* Only accounts with Admin authority can perform these operations.
2. The amount of hard disk space used is shown. If a backup is made, the amount of hard disk space used for the backup is shown.
Update Your Version
1. Download the ZIP file version of SonicDICOM from the website.
URL: http://sonicdicom.com/download/
2. Unzip the downloaded ZIP file.
3. Check to make sure that SonicDICOM is not running. If it is running, please close the program.
4. Open the install folder for SonicDICOM (by default found under "C:/Program Files (x86)/SonicDICOM"), and copy and paste the unzipped files over all the previous files.
5. Finally, run SonicDICOM.exe and check to see that it works properly.
5. Database Upgrade
1. Getting Started
The standard database used by SonicDICOM, Microsoft SQL Server Compact 4.0, is limited to a
maximum storage capacity of 4GB.
The number of studies that can be saved within that limit depends on the environment,
but we expect it to be approximately 30,000 - 100,000.
In our environment, capacity is about 40MB with about 1,000 studies saved.
The database used in SonicDICOM can be changed to Microsoft SQL Server 2014.
The maximum storage capacity of the freely available Microsoft SQL Server 2014 Express Edition is
10GB. You can also use the other edition, Microsoft SQL Server 2014, which can be purchased for
a fee.
First, we recommend you use the Express Edition that can be used for free. You can
easily upgrade to the Standard Edition from Express Edition. And it is recommended
that you use a server OS, if possible.
We provide free support for transferring databases. There are never any additional
charges.
2. System requirements
Microsoft SQL Server 2014 Express
- Microsoft Windows OS (32bit / 64bit)
- Windows 7
- Windows 7 SP1
- Windows 8
- Windows 8.1
- Windows Server 2008 R2
- Windows Server 2008 R2 SP1
- Windows Server 2012
- Windows Server 2012 R2
* Please check the Microsoft website for detailed system requirements.
http://www.microsoft.com/en-US/download/details.aspx?id=42299
* Microsoft SQL Server 2014 supports for Windows 7 and Windows Server 2008 R2 or later operating systems. For Windows Vista, please install Microsoft SQL Server 2012.
Microsoft SQL Server 2012 SP1 Express
- Microsoft Windows OS (32bit / 64bit)
- Windows Vista SP2
- Windows 7
- Windows 8
- Windows Server 2008 R2 SP1
- Windows Server 2012
* Please check the Microsoft website for detailed system requirements.
http://www.microsoft.com/en-US/download/details.aspx?id=35579
3. Download Microsoft SQL Server
1. Access the website below
http://www.microsoft.com/en-US/download/details.aspx?id=42299
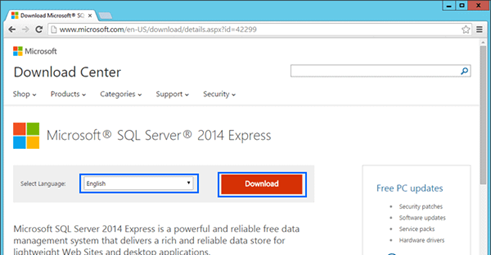
2. Select language
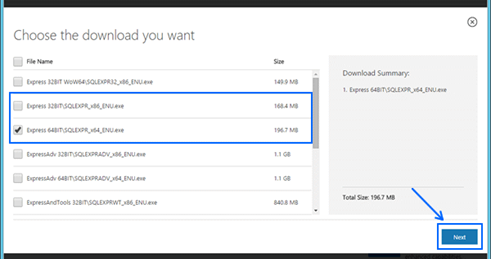
3. Click the Download button
4. Check "SQLEXPR_x86_ENU.exe" if you have a 32 bit OS, or "SQLEXPR_x64_ENU.exe" if you have a 64 bit OS, then click the "Next" button.
(The "ENU" portion of the file name will differ depending on the language you selected.)
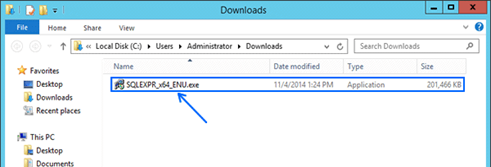
5. Select the save location and save the installer.
4. Installing Microsoft SQL Server
* Please log in to Windows as a user with Administrator permissions and complete the following steps.
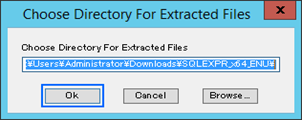
1. Run the installer you downloaded.
2. Select the location to decompress the files for installation, then click "OK".

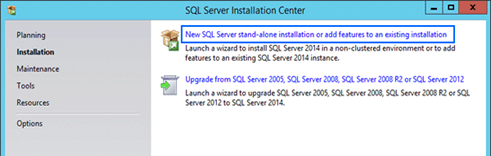
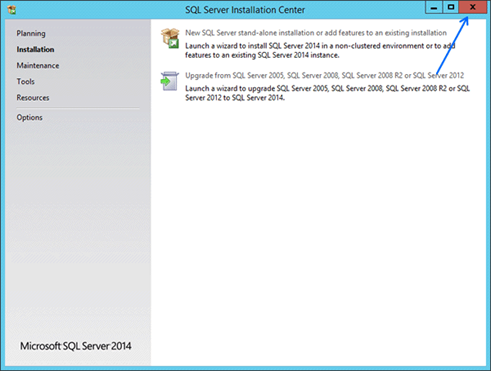
3. Select "New SQL Server stand-alone installation or add features to an existing installation".
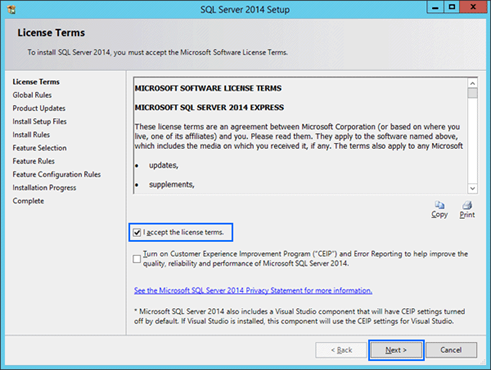
4. Confirm the License Terms. Check "I accept the license terms", then click "Next".
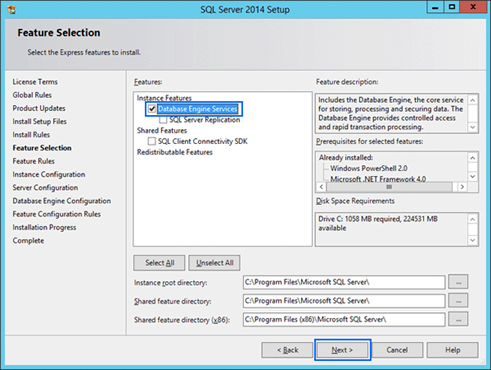
5. Check "Database Engine Services" only, as shown below, then click the "Next" button.
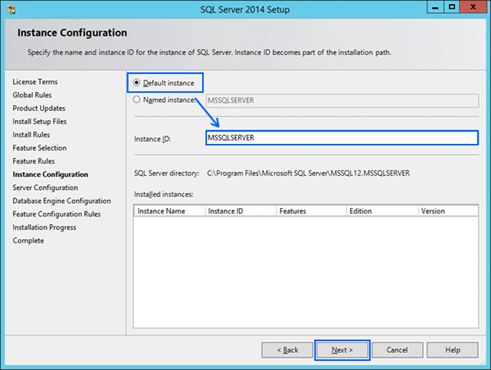
6. Select "Default instance". Confirm that the Instance ID is set to "MSSQLSERVER", then click the "Next" button.
* Please confirm carefully that "Default instance" is selected.
If you select incorrectly, SonicDICOM will not be able to operate properly, so please exercise caution.
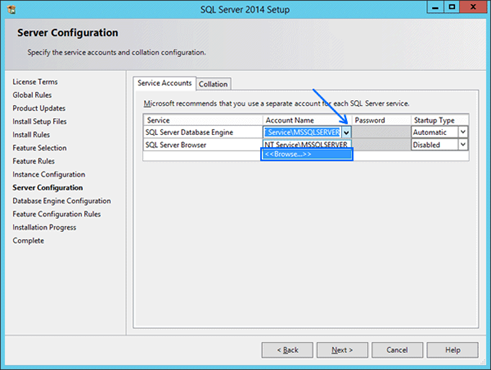
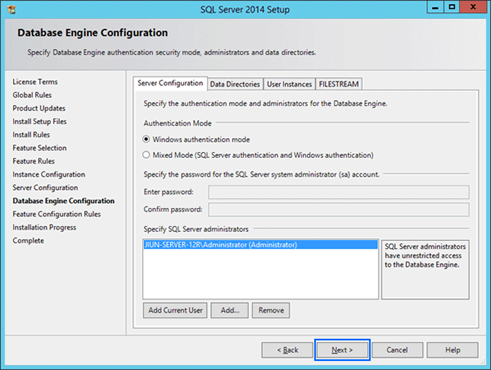
7. Click the drop down button and select "<<Browse...>>".
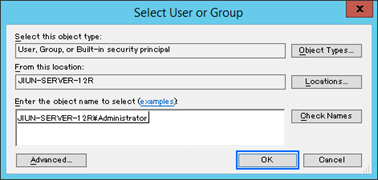
8. Enter the user name of the account that is logged in to Windows, then click the "Check Names" button.
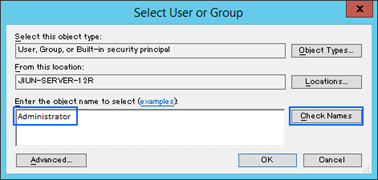
9. Click the "OK" button.
10. Enter the password of the account that is logged in to Windows, then click the "Next" button.
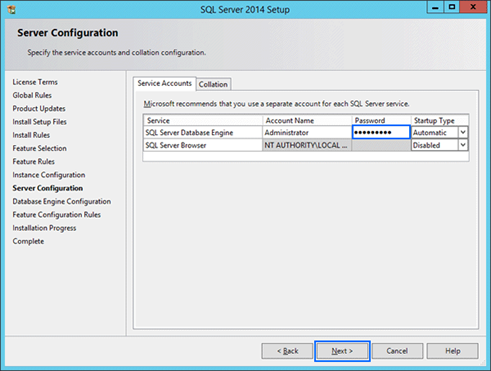
11. Click the "Next" button.
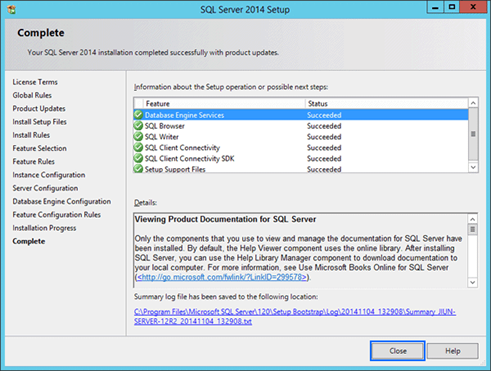
12. Installation of Microsoft SQL Server is now complete. Click the "Close" button to close the window.
13. Click the "X" at the top right to close the "SQL Server Installation Center".
5. Updating SonicDICOM
To migrate to Microsoft SQL Server, it is necessary to have SonicDICOM Version 1.3.1.0 or later installed.
If you are using a version older than Version 1.3.1.0, please update SonicDICOM.
* If you are already using Version 1.3.1.0 or later, this step is not necessary.
1. Download the ZIP file version of SonicDICOM from the website.
URL: http://sonicdicom.com/download/
2. Unzip the downloaded ZIP file.
3. Check to make sure that SonicDICOM is not running. If it is running, please close the program.
4. Open the install folder for SonicDICOM (by default found under "C:/Program Files (x86)/SonicDICOM"), and copy and paste the unzipped files over all the previous files.
5. Finally, run SonicDICOM.exe and check to see that it works properly.
6. Exporting an existing database
1. Run SonicDICOM.exe.
2. Click "Running" to stop the Web Server and DICOM Server.
3. Click the
Settings button (![]() ) to open the
Settings menu.
) to open the
Settings menu.
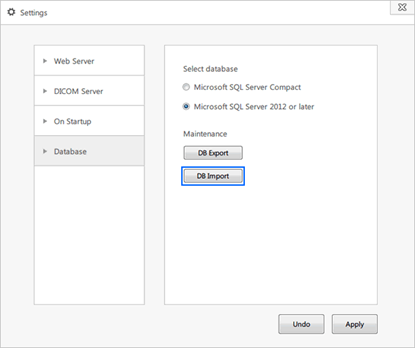
4. Open the "Database" tab.
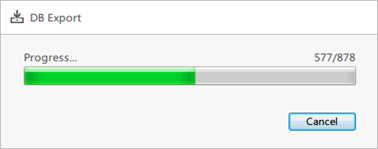
5. Click the "DB Export" button.
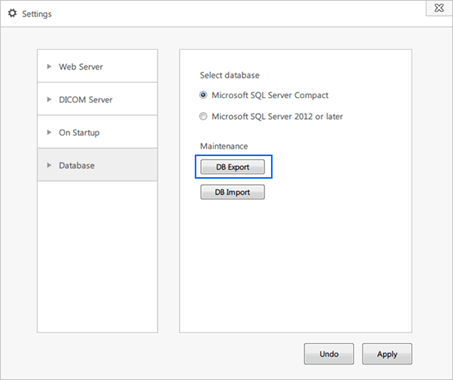
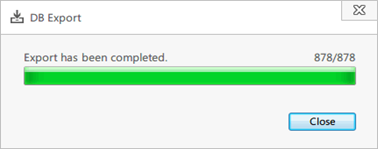
6. Select the location to export to. When you click the "OK" button, it will begin exporting.
7. When exporting is finished, click the "Close" button.
7. Switching to Microsoft SQL Server 2014
1. Run SonicDICOM.exe.
2. Click "Running" to stop the Web Server and DICOM Server.

3. Click the
Settings button (![]() ) to open the
Settings menu.
) to open the
Settings menu.
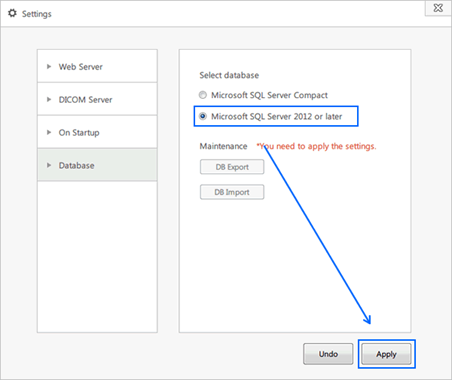
4. Open the Database tab.
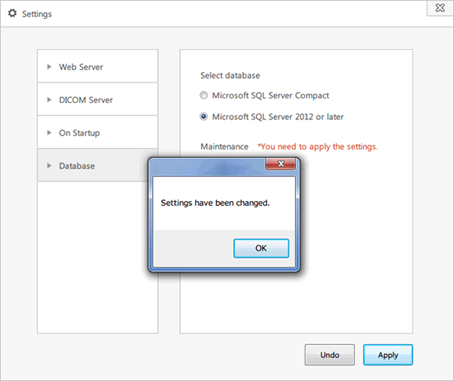
5. Select "Microsoft SQL Server 2012 or later", then click the "Apply" button.
The change will be applied when you restart SonicDICOM.
8. Importing data to the new database
1. Run SonicDICOM.exe.
2. Click "Running" to stop the Web Server and DICOM Server.
3. Click the
Settings button (![]() ) to
open the Settings menu.
) to
open the Settings menu.
4. Open the "Database" tab.
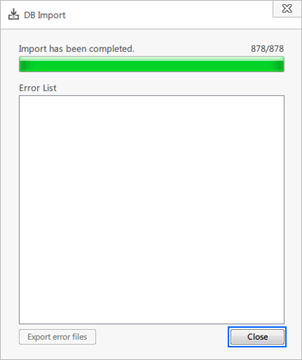
5. Click the "DB Import" button.
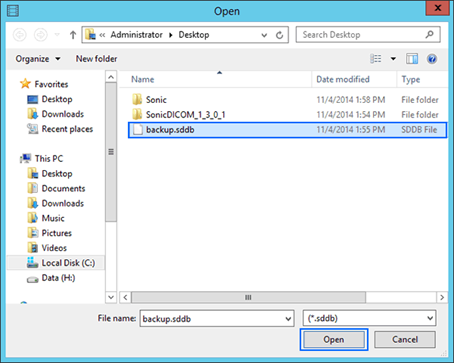
6. Select "backup.sddb". When you click "Open", it will begin importing.
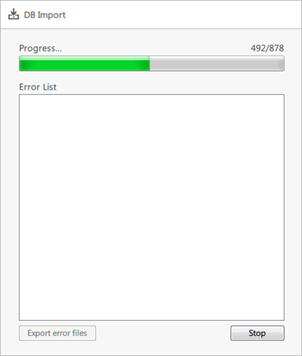
7. When importing is finished, click the "Close" button.
9. Confirming operation
Access SonicDICOM from your web browser to confirm that the data has been migrated to the new database.
[Appendix] FAQ
[FAQ] I can't receive DICOM.
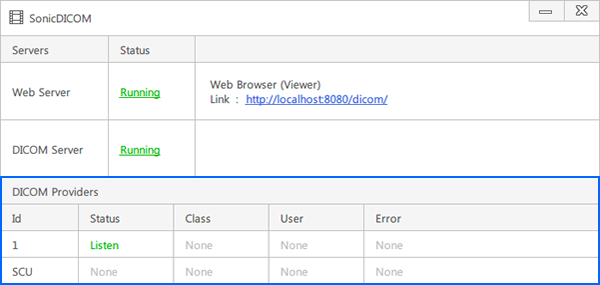
Confirm the status of the DICOM Server.
Confirmation procedures are as follows.
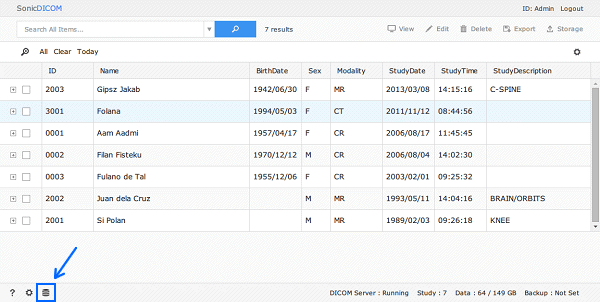
(1) Login the viewer as a user with Admin authorization.
(2) The status of the DICOM Server is displayed at the lower left of the list screen.
If status is "Stopped":
The DICOM Server is not running.
Start DICOM Server services.
Refer to "How to use" for operation instructions.
If status is "Running":
a. Confirm that settings such as AE Title, IP Address, Port No, etc. are all correct.
b. Use the firewall function on your PC to confirm that the port used by the DICOM Server is properly correctly released.
c. Check the log.
If this still does not solve the problem, please place an inquiry from the inquiry form.
Be sure to include the contents of the log in the body of the inquiry.
[FAQ] Can I connect it to another company's DICOM Viewer?
Yes, of course.
However, Q/R function is required for DICOM Viewer.
[FAQ] How do I check my IP address?
1. Press [Win] + [r].
2. Type "cmd" and press [Enter].
3. At the command prompt, enter: ipconfig
The IP address will be a series of numbers following the pattern xxx.xxx.xxx.xxx (e.g., 192.168.100.10).
[Microsoft: Find your computer's IP address]
http://windows.microsoft.com/en-us/windows/find-computers-ip-address
Learn how to find the IP address of your computer on the network.
Windows 7, Windows Vista
[FAQ] How do I set a fixed IP address?
The procedure for setting a fixed private IP address is provided below.
To configure an IP address, you need to know about your network.
Changing IP address settings can cause problems in computers that are connected to the Internet.
Please make sure you understand your network in order to properly configure your IP address.
If you do not understand, please consult with your network administrator or another person who can assist you.
1. Open Network Connections by clicking the Start button, and then clicking Control Panel.
In the search box, type "adapter", and then, under Network and Sharing Center, click View network connections.
2. Right-click the connection that you want to change, and then click Properties.
Administrator permission required If you're prompted for an administrator password or confirmation, type the password or provide confirmation.
3. Click the Networking tab. Under This connection uses the following items, click either Internet Protocol Version 4 (TCP/IPv4), and then click Properties.
4. In the Internet Protocol Version 4 (TCP/IPv4) Properties window, click Use the following IP address, and then, in the IP address, Subnet mask, and Default gateway boxes, type the IP address settings.
[FAQ] How do I check my communication port?
Clicking on Admin
Settings button (![]() ) brings up the Setting screen.
) brings up the Setting screen.
* Only accounts with Admin authority can perform these operations.
List of DICOM Servers is displayed.
You can find the communication port number.
[FAQ] How do I change my communication port?
Clicking on Admin
Settings button (![]() ) brings up the Setting screen.
) brings up the Setting screen.
* Only accounts with Admin authority can perform these operations.
List of DICOM servers is displayed.
The registered contents can be changed by moving the cursor over the provider to be changed in the list, and clicking on the edit button.
[FAQ] How do I check my AETitle?
Clicking on Admin
Settings button (![]() ) brings up the Setting screen.
) brings up the Setting screen.
* Only accounts with Admin authority can perform these operations.
List of DICOM Servers is displayed.
You can find the AETitle.
[FAQ] How do I change my AETitle?
Clicking on Admin
Settings button (![]() ) brings up the Setting screen.
) brings up the Setting screen.
* Only accounts with Admin authority can perform these operations.
List of DICOM servers is displayed.
The registered contents can be changed by moving the cursor over the provider to be changed in the list, and clicking on the edit button.
[FAQ] What to do if you have garbled text.
1. Check SonicDICOM's language settings
Open the server setup wizard.
Click "Next," and open "DICOM server setting".
Select the language you are using from the languages in Step 4.
Close the setup wizard.
2. Re-send the image from the modality
(If the problem is still not resolved)
Send us the DICOM file with the garbled text via email. Our email address is "sonic@sonicdicom.com".